Table of Contents
Table
of Contents................................................................................................................................................ 1
Introduction to the Web
Address Manager....................................................................................... 2
Getting Started...................................................................................................................................................... 3
Installing the Web Address Manager to a hard
disk................................................................ 3
Using Windows 95/NT
Explorer.......................................................................................................................... 3
Using the Command Line...................................................................................................................................... 3
Starting the Web Address Manager...................................................................................................... 4
Using the Windows 95/NT
Explorer................................................................................................................... 4
Starting from the Run
Dialog............................................................................................................................... 4
Starting From the
Command Line....................................................................................................................... 5
Interface..................................................................................................................................................................... 6
The Main Screen................................................................................................................................................... 6
The Main Display Area......................................................................................................................................... 6
Navigation............................................................................................................................................................... 6
The Status line........................................................................................................................................................ 6
Accessing pull-down
menus................................................................................................................................. 6
The File Menu.......................................................................................................................................................... 7
New…....................................................................................................................................................................... 7
Import…................................................................................................................................................................... 7
Open…...................................................................................................................................................................... 7
Save........................................................................................................................................................................... 7
Save As…................................................................................................................................................................. 7
Close......................................................................................................................................................................... 7
Quit........................................................................................................................................................................... 7
The Edit Menu......................................................................................................................................................... 7
Title…....................................................................................................................................................................... 7
Link…....................................................................................................................................................................... 8
Add Date….............................................................................................................................................................. 8
Visit Date…............................................................................................................................................................. 8
Modified Date…..................................................................................................................................................... 8
Comments…............................................................................................................................................................. 8
The WAM Menu...................................................................................................................................................... 8
Create Folder…...................................................................................................................................................... 8
Create Bookmark…............................................................................................................................................... 8
Delete….................................................................................................................................................................... 8
Move…..................................................................................................................................................................... 8
View…...................................................................................................................................................................... 9
The Search Menu.................................................................................................................................................. 9
Folder…................................................................................................................................................................... 9
Bookmark…............................................................................................................................................................ 9
The Program Menu............................................................................................................................................. 9
About….................................................................................................................................................................... 9
Help….................................................................................................................................................................... 10
Troubleshooting................................................................................................................................................ 11
Window Borders Appear Garbled When Running in
a Window Under NT...................... 11
Error: “Could not open: About.txt File not
displayed”........................................................... 11
Contact Information...................................................................................................................................... 12
Introduction to the Web Address Manager
The Web Address Manager (WAM) is a tool for the management of a collection of Netscape-style World Wide Web bookmarks. The WAM allows the user to organize the bookmarks by placing them in folders and subfolders. The number of folders and bookmarks is limited only by the amount of memory made available to the WAM by the host operating system. The WAM is able to import from the Netscape Navigator 4.x file format and is able to load and save the proprietary .WAM file format.
The WAM allows you to edit any relevant property of a bookmark or folder (item). These properties include name, comment, and add date for folders, and name, comment, add date, modified date, and date of the last visit. Bookmarks and folders can be moved through the folder hierarchy by using the Move command located in the WAM menu.
You can add items using WAM Menu’s “Create Folder…” and “Create Bookmark…” options. Items can be deleted with the WAM Menu’s delete function. Bookmarks are deleted without any fuss. Folders, though, can be deleted either “recursively” (the selected folder and all subfolders), or the child folders can be “shifted” to the current folder before the folder is deleted.
The WAM allows you to search for a bookmark or folder. When you select one of the options in the Search Menu, you are prompted to enter text, which the WAM will search for through the entire hierarchy. All folders or bookmarks that match the text are displayed in the main display area.
An overview of the entire bookmark/folder hierarchy is available from the WAM menu’s view option. The overview is presented in a labeled outline form, with indentation showing the relationship between folders and bookmarks.
The Web Address Manager is a project for N. D. Barnette’s CS2574 class. It is the latest stage of the evolution beginning with the Web Address Checker and the Web Address List projects. The WAM contains a substantial amount of code from both the Web Address Checker and the Web Address List. In addition, the WAM has a text-windowing user interface and features such as recursive delete, move, view, and a more detailed bookmark information screen.
Summary:
The WAM boasts these features:
· Folder Hierarchy: The user can navigate and modify this hierarchy. This allows WAM users to maintain a list of hundreds or thousands of URLs, without going crazy.
· Import Netscape HTML Bookmark Files: This allows use of the WAM and Netscape Communicator in concert.
· Load and Save: Open, Save, Save As, Close, etc. These allow users to save their work from one session to another, and share databases with other WAM users.
· Edit: Change any relevant property of a folder or bookmark.
· Search: Allows the user to search for bookmarks or folders matching specific criteria throughout the entire URL database
· Help: This user’s manual is offered online through the Program Menu’s Help option.
· Ease of Use: The WAM is relatively easy to use. It features a text-windowing GUI that is similar in nature to the familiar GUIs of most platforms, though less feature-ridden.
Getting Started
Installing the Web Address Manager to a hard disk
The Web Address Manager is designed to run from the hard or heavily cached disk. The responsiveness of the user interface depends on being able to load files quickly. Loading and saving files on a hard disk is just plain faster, too. Installing to the hard disk is a good idea.
The following sections contain instructions for several methods of installing the WAM. These instructions assume a typical DOS/Windows 95/Windows NT disk configuration. While the majority of all machines use this configuration, it is by no means standard.
Using Windows 95/NT Explorer
These instructions assume that no windows are covering the desktop.
Starting from the Windows desktop:
1.
Double-click on “My Computer”, which will be identified by the
 icon.
icon.
2.
Double-click on the hard disk, which will be similar to the ![]() icon. A window will appear with the contents of
your hard disk.
icon. A window will appear with the contents of
your hard disk.
3. Right-click on the white area of the hard disk window. A pop-up menu box will appear.
4. Select “New” in the pop-up menu box. Another pop-up menu box will appear.
5.
Select “Folder” at the top of the list. The pop-up menu boxes will disappear and a
folder icon ( ) will appear with the name “New Folder” and the cursor ready
to change the name.
) will appear with the name “New Folder” and the cursor ready
to change the name.
6. Type “WAM” and press enter
7. Click the “My Computer” window.
8.
Double-click on the floppy disk ( ).
).
9.
Double-click on the Executable folder (![]() )
)
10. Click on the “Edit Menu” and the “Select All”. Every icon in the window should appear highlighted.
11.
Drag the contents of the floppy disk window onto the WAM
folder(![]() )
)
The WAM is now installed to your hard disk!
Using the Command Line
Starting from the Windows 95/NT task bar.
1.
Click on the “![]() ” button
” button
2. Click on the “Run” option
3. In the text box labeled “Open”, type “command” or “cmd” (if running under NT) and press Enter.
4. At the “C:\>” or “C:\WINDOWS\Desktop>” prompt, type “md C:\WAM” and press Enter.
5. The same prompt should appear again. Type “copy A:\Executable\*.* C:\WAM” and press Enter
The WAM is now installed to your hard disk!
Starting the Web Address Manager
Using the Windows 95/NT Explorer
From a Floppy
These instructions assume that no windows are covering the desktop.
Starting from the Windows desktop:
1.
Double-click on 
2.
Double-click on 
3.
Double-click on ![]()
4.
Double-clock on ![]()
From a Hard Disk
These instructions assume that no windows are covering the desktop.
Starting from the Windows desktop:
1.
Double-click on 
2.
Double-click on ![]()
3.
Double-click on ![]()
4.
Double-clock on ![]()
Starting from the Run Dialog
The Web Address Manager is a console application. It runs in text mode and accepts command line parameters.
The Web Address Manager supports the optional loading of WAM files from the command line. If no parameters are selected, then the WAM starts without a file loaded.
From a Floppy
Starting from the Windows 95/NT task bar.
1.
Click on the “![]() ” button
” button
2. Click on the “Run” option
3. In the text box labeled “Open”, type “A:\Executable\WAM”
4. Optional: you can type in the path and filename (including the extension) of a WAM file to open on startup. Must be separated from text entered in step 3 by a space.
5. Press Enter.
From a Hard Disk
Starting from the Windows 95/NT task bar.
1.
Click on the “![]() ” button
” button
2. Click on the “Run” option
3. In the text box labeled “Open”, type “C:\WAM\WAM”
4. Optional: you can type in the path and filename (including the extension) of a WAM file to open on startup. Must be separated from text entered in step 3 by a space.
5. Press Enter.
Starting From the Command Line
Since the WAM is a console application, it often makes sense to start it from the command line. WAM files can be loaded from the command line.
From a Floppy
To start the WAM from a floppy disk, type the following commands:
1. A:
2. CD \Executable
3. WAM [Optional: Path & filename of WAM file to start]
The WAM will create a second console window. This might cause a little bit of a shock if you are running in full screen mode. Running in a window may cause the borders of the windows to appear garbled – see the Troubleshooting section for more information on how to correct this problem.
From a Hard Disk
To start the WAM from a floppy disk, type the following commands:
1. A:
2. CD \Executable
3. WAM [Optional: Path & filename of WAM file to start]
The WAM will create a second console window. This might cause a little bit of a shock if you are running in full screen mode. Running in a window may cause the borders of the windows to appear garbled – see the Troubleshooting section for more information on how to correct this problem.
Interface
The Main Screen
The main screen is the center of all user interactions. The main screen is divided up into several sections:
The Main Display Area
The main display area is the center of the program. All folders and bookmarks in the current folder are displayed here. The highlight bar shows the item that is currently selected. The highlight bar can moved by pressing the up and down arrow keys. All menu actions that operate on a specific item (edit, delete, move, etc.) operate on the item selected by the vertical highlight bar.
Navigation
The WAM interface revolves around the current folder concept. The main display area shows the contents of the current folder, which is, by default, the root folder of the hierarchy. You can navigate through the folder hierarchy by selecting an item with the highlight bar and pressing “Enter”. If you choose a folder, it will become the new current folder and its contents will be displayed. If you select a bookmark, all relevant information associated with the bookmark will be displayed in a dialog box.
The Status line
The Status line is located at the top of the main display area, just under the menu bar. It shows the names of the current file and the current folder. If there is no file currently loaded, the status line states “No Current File”.
Accessing pull-down menus
Pressing the first letter of the title accesses pull-down menus. The menu titles and the keys associated are as follows:
|
Menu |
|
|
File |
|
|
E |
Edit |
|
W |
WAM |
|
S |
Search |
|
P |
Program |
The menu will appear and you will be able to select an action by moving a highlight with the arrow keys and pressing “Enter”. If you want to exit the menu without performing any action, just press any key other than “Enter”.
The File Menu
The file contains options dealing with entire files. The actions are explained below.
New…
Create a blank WAM file. You will be prompted for information about the root folder of this file. This blank file can be added to and managed just like any other. If a file is currently loaded, an error message will appear.
Import…
Import HTML Bookmark file. This action reads through a Netscape HTML-based bookmark file and loads the bookmarks and folder hierarchy into the WAM. You will be prompted for the path and filename of the HTML file to import. If the import is successful, the root folder of the HTML file will appear in the Main Display Area, otherwise, a dialog box will appear stating “Could not load HTML file”.
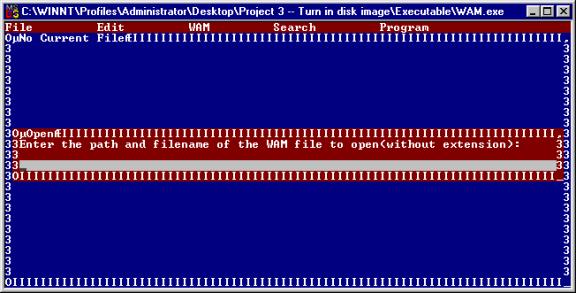
Open…
Open existing WAM file. This action loads an existing .WAM file into the Web Address Manager. You will be prompted for the path and filename of the WAM file to load. If the open is successful, the contents of the WAM file’s root folder will appear in the main display area. If the load is not successful, a dialog box will appear stating “Could not load WAM file”.
Save
Saves the current file as a WAM file. If the file loaded was a WAM file, the save action will replace the old WAM file. If the file was imported from HTML, the save action will write a WAM file with the same base name as the HTML file. For example, if you were to import “e:\luke.htm” and then save, the file would be saved as “e:\luke.wam”. If no file is currently loaded, an error message will appear.
Save As…
Save the current file with a new filename. A dialog will appear requesting the new filename. The .WAM extension will be automatically added to whatever you type. Existing files will be overwritten without prompting. If no file is loaded, or if the filename is invalid, an error message will appear.
Close
Removes the current file from memory without saving. An “are you sure” box will appear to confirm your choice.
Quit
Exits out of the WAM. An “are you sure” box will appear to confirm your choice.
The Edit Menu
The Edit menu contains options for modifying existing folders and bookmarks. The edit operates on the item currently selected by the vertical highlight in the main display area.
Title…
Changes the title of the currently selected folder or bookmark. This is the title displayed in the main display area when browsing folders & bookmarks. A prompt dialog box will appear requesting the new title for the item.
Link…
Changes the text of the URL that the bookmark refers to. For instance, suppose you had a bookmark titled “My current CS Class” which currently refers to http://ei.cs.vt.edu/~1704. After acing the exam, you need to change it to refer to the next class in the sequence. You would use this action to change it to http://actor.cs.vt.edu/~kafura/cs2704. A prompt dialog box will appear requesting the new URL for the item. This action is not available for folders.
Add Date…
Changes the date that the currently selected folder or bookmark was added to the hierarchy. A sequence of dialog boxes will appear requesting the month, day, and year for the new add date. Pressing “Esc” in a month, day, or year dialog box will leave that particular part of the date unchanged.
Visit Date…
Changes the last recorded visit to the currently selected bookmark. A sequence of dialog boxes will appear requesting the month, day, and year for the new add date. Pressing “Esc” in a month, day, or year dialog box will leave that particular part of the date unchanged.
Modified Date…
Changes the recorded date of the last modification to the currently selected bookmark. A sequence of dialog boxes will appear requesting the month, day, and year for the new add date. Pressing “Esc” in a month, day, or year dialog box will leave that particular part of the date unchanged.
Comments…
Changes the comment field of the currently selected folder or bookmark. A prompt dialog box will appear requesting the new comment line for the item.
The WAM Menu
The WAM menu allows actions that deal with entire folders or bookmarks.
Create Folder…
Create a new folder. Folders are created in the current folder. A sequence of dialog boxes will appear, requesting a name for the folder, comments, and today’s date (add date).
Create Bookmark…
Creates a new bookmark. Bookmarks are created in the folder shown on the status line. A sequence of dialog boxes will appear requesting a name, comments, and today’s date (add date).
Delete…
Deletes the selected bookmark or folder. If a bookmark is selected, it is promptly deleted without any fuss. If a folder is selected, a prompt dialog will appear asking how to handle subfolders.
There are two types of folder deletion available:
· Shift: Deletes the folder the folder and promotes all subfolders to the current folder.
· Recursive: Deletes the folder, and all subfolders in the currently selected folder
Whenever a folder is deleted, all child bookmarks are deleted.
Move…
Moves the selected folder or bookmark to any folder accessible from the current folder. A list dialog will appear with possible destination folders. You can pick a destination with the arrow keys and then pressing “Enter”. Pressing any other key will abort the move.
View…
Displays a hierarchical list of all folders and bookmarks in the currently loaded file. A typical view is shown below:
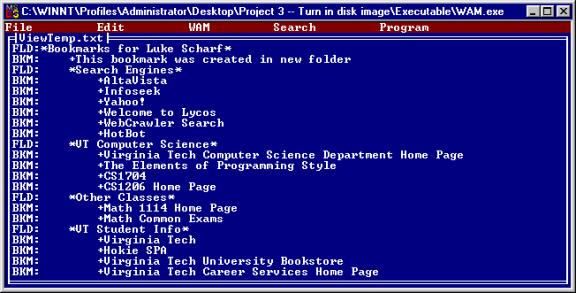
On the left side, each line is designated as a folder or bookmark with an abbreviated label and an asterisk or a plus sign. Folders are identified by the asterisk on either side of the name (ex: “*Search Engines”) and the label “FLD” on the left side of the screen. Bookmarks are identified by a plus sign preceding the bookmark name (ex: “+AltaVista”) and the label “BKM” on the left side of the screen.
You can scroll through this list using the arrow keys, page up, page down, and home. Pressing any alphanumeric key, Esc, or Enter will exit back to the Main Display Area.
The Search Menu
The search menu provides a mechanism for searching through the folder and bookmark lists for items whose names begin with some specified text.
Folder…
Searches for folders beginning with specified text. A dialog box appears requesting the text to search for. All folders beginning with the text that was entered are displayed in the main display area. The displayed folders can be modified and just as if the search results were a real folder. A link to the root folder is provided in case the search finds nothing. The search results are lost when you change to a new folder.
Bookmark…
Searches for bookmarks beginning with specified text. A dialog box appears requesting the text to search for. All bookmarks beginning with the text that was entered are displayed in the main display area. All bookmarks can be modified and changed as if the search results were a real folder. A link to the root bookmark is provided as a way to escape the search results “folder”.
The Program Menu
The program menu contains information about the WAM, including the program summary and help.
About…
Same as the program’s main splash screen. Displays a short summary of what the WAM is and does. Some information on how to contact the author is also provided.
Help…
Displays online help. The online help is basically an electronic version of this manual, without the images, and without the introductory information. The help screen can be navigated with the arrow keys, page up, page down, and the enter key. Pressing any alphanumeric key, Esc, or Enter will exit back to the Main Display Area.
Troubleshooting
Window Borders Appear Garbled When Running in a Window Under NT
1.
Click on the ![]() icon in the upper
left hand corner of the window
icon in the upper
left hand corner of the window
Error: “Could not open: About.txt File not displayed”.
This problem is the result of a missing screen file. Follow these steps to resolve the problem:
1. Re-install the WAM as per instructions in the “Getting Started” section of this manual.
2. Make sure that the WAM is started from the directory containing About.txt, Help.txt, WAMMenu.txt, FileMenu.txt, ProgMenu.txt, SearchMenu.txt, EditMenu.txt. These files are all very important to the operation of the WAM.
3. Contact the author for a new copy of the install disk.
Glossary
|
Word/Phrase |
Definition |
|
Bookmark |
An element of data containing a name, a URL, and three dates. The dates refer to the date the folder was added, the last date that the folder was modified, and the date of the last time you visited the site. |
|
File |
Element in the file-system hierarchy that contains data. See DOS for Dummies or the FAT disk format specification for more information. |
|
Folder |
An element of data containing a name, zero or more folders, and zero or more bookmarks. |
|
Hierarchy |
A way of organizing information. Basically an outline or tree organization, in which elements are contained in directories or folders. For an in-depth description, see any book that describes a file system, or any Computer Science textbook. |
|
Item |
A folder or bookmark. |
|
Root Folder |
The topmost folder. This folder is protected – it cannot be deleted or moved. It also contains, directly or indirectly, all items in the hierarchy. |
|
URL |
Universal Resource Locator. Basically the text used to identify a web page, but can be used to identify other resources such as e-mail addresses, FTP servers, gopher servers, etc. |
|
Web Address Manager – read this entire manual for more information |
Contact Information
For questions, comments, and to deliver a grade for this project, please contact:
Name: Lucas Scharf
E-mail (preferred): lscharf@vt.edu
Telephone: (540) 232-6580
Class: CS2574
2:00p Monday, Wednesday, Friday
McBryde 113
Mail: 2042 Ambler-Johnson
West
Virginia Tech
Blacksburg, VA 24060